D-Link G604T
Before You Begin
Connecting the Router to Your Computer
Configuring the Router
Before You Begin
Make sure you have your Username, Password and Equipment before beginning the installation.
Note: This install assumes that you have a Network Card installed and is in working order.
Connecting the Router to Your Computer
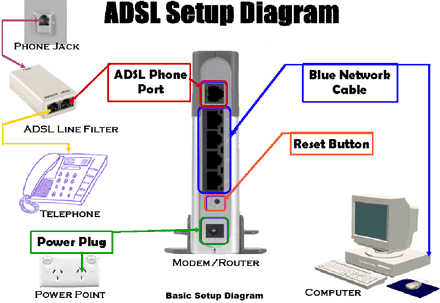
A. First, connect the power adapter to the back panel of the Router and then plug the other end of the power adapter to a wall outlet.
The Power LED will turn ON to indicate proper operation.
B. Insert one end of the Ethernet cable (Blue Cable) into any Ethernet port on the back panel of the Router and the other end of the cable to an Ethernet Adapter on your computer.
C. Insert one end of the Telephone cable into the ADSL port on the rear panel of the Router and insert the other end into the ADSL phone line wall socket.
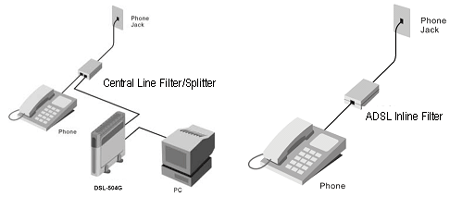
D. Most people will simply just need a Central Line Filter/Splitter, which splits the telephone line into two. One for the Router, and one for the telephone.
If you have more then one telephone on the telephone line, you will also need an Inline Filter.
Note: Do not install a filter between the Router and the telephone jack. Filters are only intended for use with regular telephones, fax machines and other regular telephone devices.


Configuring the Router
To configure the router, you will need to log into the
Routers Configuration Interface.
Step 1
Open your Web browser (eg Internet Explorer or Netscape) and type 10.1.1.1 into the address box.
Then press the Enter or Return key.

Step 2
The Router’s Login page will appear.
Type admin for the User Name and admin in the Password field, then Click OK

You are now logged into the Router
Step 3
To begin using the Setup Wizard to configure your ADSL Connection, click on the Run Wizard button in the middle of the web page. A pop-up menu will appear. This pop-up menu is the Setup Wizard.

Step 4
The first Setup Wizard menu lists a summary of the steps required to complete the setup.
Click the Next button to begin setup.

Step 5
Now configure the Time Zone used for the Router’s system clock. Select the appropriate timezone for your location.
Eg: (GMT+ 10:00) Canberra, Melbourne, Sydney
Click Next to continue.

Step 6
Select the Connection Type PPPoE/PPPoA
Click the Next button.

Step 7
Type the Username (eg joebloggs@dsl.fastrac.net.au) and Password for your Shoalnet/Fastrac Account.
Click the Next button.

Step 8
The SSID should be changed from the default DLINK to something different, eg your name or your company name.
The Channel can be set to any one of the thirteen available.
**Note** Shoalnet/Fastrac do not support settings up Wireless LAN, please consult your network administrator that looks after your network, or the manual on the CD that came with the router.

Step 9
Setup Completed
All the settings for the ADSL connection have now been completed.
Click the Restart button to save the new settings and restart the Router.
It will take about 30-60 seconds to restart the Router.

Step 10
The screens pictured here will appear during the save and restart process. Do not turn off the Router.

Step 11
Once the box in Step 10 has disappeared you should be taken back to the main router page (Like in Step 1).
Close out of this window.
You should now be able to access the internet. If you are having trouble please read the ADSL FAQ before calling.
If you have any problems, give Shoalnet Techsupport a call on (02) 4423 7100 or 1300 666 556
|


